Tuesday, August 27, 2013

rotary blade sharpener: worth it?


It didn't take much convincing to get me to join the rotary cutter gang. Nah, it's not what it sounds like. I'm a nonviolent person (...the kind of person who cries in public while listening to a This American Life podcast episode about teen gang violence). I'm talking about sewing tools, and my obsession with speediness but with a desperate need for accurate cutting. Rotary cutters are the perfect invention.

With the volume of sewing I tend to do (only three-quarters of which lands on the blog), I've been blowing through rotary blades like crazy. I cut a lot of fabric, of course, but I also went through an experimental phase where I was cutting pattern tissue paper with them, too, just to see if it dulled the blades more quicky. FYI: it does. I didn't really mind when my blades got too dull for fabric, because I could then use them to cut out PDF patterns from computer paper. Swear! Only when the blades got so severely knicked up would I resign them to the trash (after putting them back in their original packaging so I wouldn't slice open the trash bags).

Still, I felt like I was spending unnecessary cash on something that can become so easily damaged and quickly disposable. And nothing's more infuriating than a knicked blade that leaves attached threads along the edge of the fabric, or pushes up mountains of fabric as you try to roll along. You know the drill:


This is supposed to be a sustainable hobby, right? Ha. So I finally decided to make another investment to see if I could extend the life of these bad boys. Enter the dual rotary blade sharpener, in this case produced by the Colonial brand. I bought it for about $15 USD with free shipping on Amazon (here). 


This one is simple, plastic. Seems like a toy you'd find in your McDonald's Happy Meal bag. You screw these two knobs together to secure the blade, then insert that in the disk and turn. The blade rubs against the ringed sharpener. There's a course side and a fine side to the sharpener, which you use in successive order.


The instructions warn you that it may take more than one try to get it to work on a dull blade. Once it's been warmed up to the sharpening process, it will take to it more easily in the future. Or something. I sharpened as instructed and tried it. Honestly didn't really work. Still dinged up:


I went through the sharpening process again. And it worked! Not an annoying connective thread in sight. This is a new section of fabric:


Whooohoo. I got a lil scrap happy. A blade that was destined for the landfill is back in the game. I say it's worth it... considering $15 is the cost of three Fiskars replacement blades, which for me would go rather quickly. And considering the "Twist 'n Sharp" pun is spot on.


Have you tried a similar gadget, or have a fancier one? Does it work for you? What do you think?

Rotarize in peace and save your dough, my friends. P.S. I hope you enjoyed the primary color overload in this post. ;o)

Sunday, August 25, 2013

when culottes attack

Sure, I'll wear heels with a circle skirt, if the occasion feels right. But I've never worn heels with shorts before.


UNTIL NOW.


Well, these ain't shorts really. They're culottes, sewn from the Tania Culottes pattern by Megan Nielsen. I researched (er, wikipedia'd) the origin/meaning of culottes, and the word used to refer to the knee-breeches worn by French aristocrats in the 16th century. Working class revolutionaries were called "sans-culottes" (literally, without culottes), which was used as a derogatory term, obvi. So basically that means I'm like royalty in these culottes, you guys. Except "culottes" now can mean "panties" in French. Great. Whatever. I can't keep up with fashion.


I haven't ordered a paper pattern via mail in ages, so the wait felt excruciating. I've become a PDF pattern junkie, looking for that quick fix. Newsflash: the Tania Culottes (and a couple other MN patterns) are now available as a PDF on her website (here), as of like yesterday. Smart thinkin', Megs.

Anyway, the pattern finally arrived and I sewed my first pair immediately. I was just so curious to see how they were constructed, after reading other bloggers mention the clever pleating system. To the untrained eye, it looks like there's a center front and back seam in a normal skirt, but it's actually a large box pleat in the front and back that is stitched several inches down the skirt then stops. A couple inches behind the pleat is the actual seat seam. All the draping of the large pleat and circle-cut legs creates the look of a skirt. Tunnel vision:


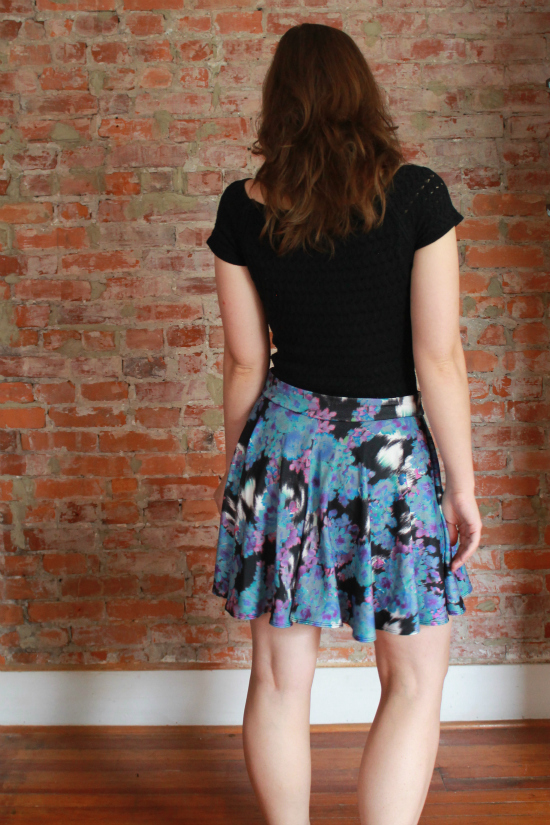
I decided to make my culottes in a knit fabric because... because! I just tend to have a higher proportion of stretchies in my stash and I liked this watercolor print. It's a stable jersey or somethin' from a local discount fabric store. The pattern calls for woven fabrics and an invisible side zipper. I eliminated the zipper, so I sewed both side seams, constructed the waistband all together then attached it as one to the waist of the culottes. I serged elastic to the seam allowance of the waist so it doesn't stretch out when I go to pull the waist over my not-so-tiny hips. So it's a bulky seam, oh well.


I finished the hem with my coverstitch machine (review of my machine is here), though it's really not necessary because these culotte legs are enormous circles and will never have to be stretched over any body part. Speaking of the legs being enormous circles, that means it's still VERY possible to flash your naughties if you lift up your leg to throw over a bicycle, for instance. The crotch seam is quite low, actually, so while these culottes help control some windy-day chaos, you're not entirely safe from a little oops moment. Just saying!


Sizing reference: For this pair I made a size S in the waist with a size L length. I should have gone down a size in the waist to accommodate the fabric's stretch, because this pair hangs lower on my waist than I think they're intended. Even at the "large" length with a saggy fit, these 'lottes are pretty short! I'm 5'7, btw.

On my first pair, I noticed the same issue that many others mentioned about making this pattern (i.e. Nette, Lladybird, Scruffy Badger): the back drooped far below the front, and took quite a bit of adjustment to even everything out. Of course, garments cut on the bias are prone to stretching out, but it seemed a little excessive. Plus, I noticed the back was drooping the very first time I held them up vertically, so it didn't seem like something that resulted from hanging or wearing.

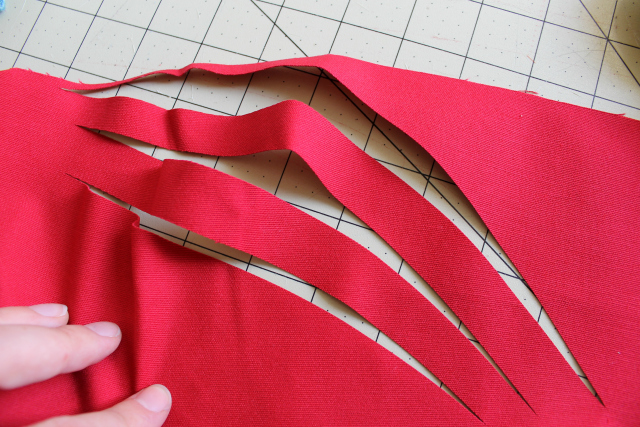
So I did some investigation. The pattern is, in fact, drafted this way. It's not a perfect circle and the back is drafted to be 2" longer than the front and sides to accommodate your rear end. Megan did mention the slightly longer back in her description of the culottes when they were first released (here). But I guess 2" is a little generous in a non-fitted circle skirt/culotte. And 2" in addition to the natural stretching of the bias may lead to even more drooping. I decided to re-draft it so the hem is even to begin with.


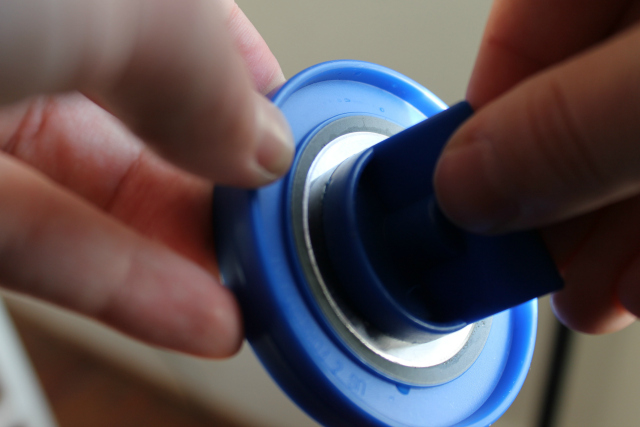
I found the center point of the circle and measured everything from there. Please pardon my janky use of canned tomatoes and chilies as pattern weights. The side seam (which is the upper horizontal edge of the photo above) is about 20" long from center point to the size L length:


Sorry the measuring tape is upside down. Anyway, you'll see that as you move along the skirt to measure the bias, the hem is drafted to 22" long:


I wanted it to be the same all the way around, so I decided to stick with the longer length since my first culottes are pretty short. So I made the back 22" long all the way around, and made the front 22" long all the way around as well.


I used the altered pattern to make a second pair. And after 24 hours of hanging, the hem was still relatively even. No droopy pants! But, I must confess, now the center back is an eensy bit higher than the rest of the culottes because my badonk is in the way, so I guess I made the mistake of making the hem TOO even. Ah well, learning. If you were to adjust your pattern like I did, maybe keep a tiny bit of extra length in the back. But not a full 2 inches. Or do whatchu want. I'm not here to preach about pattern drafting.


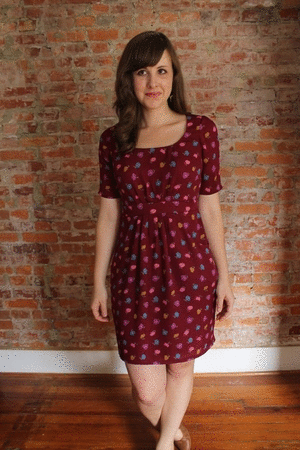
This is my fancy version. It's still a knit, but a pretty thick one so the circley femininity is exaggerated. This is leftover fabric from a dress I made in May (seen in my MMM photos here). The fabric is spongy, hot and not very stretchy so I don't really like wearing it in the summer. It's a blue knit fabric that has black lace fused to its right side.


Word to the wise: If you're using a directional, striped or plaid fabric for these bad boys, remember that the front and back pleat seam is what the world will see in the center, so be sure to match your print there. I didn't think about it and had to manipulate the fabric after the fact.


Not truly symmetrical but the best I could do!

The Tania Culotte is a fun, unique pattern that is super quick to make. Though the garment doesn't offer all the the practicality and coverage I expected, I still enjoy wearing them and demonstrating my "culotte-reveal pose" (seen in second photo above) to unsuspecting friends.

How do you feel about wearing culottes in the year 2013? I must say I prefer these to knee breeches, the culottes of yore...

Sunday, August 11, 2013

#sewingfordudes


I haven't been inspired by many women's apparel patterns lately (except for one that's taking forever to arrive by mail), but luckily for the main man in my life, Thread Theory just launched a refreshingly modern pattern line for dude clothes. We all know that the commercial patterns currently available for men are abysmal and laughable at best (check out all 8 of Butterick's studly options here), so I think Thread Theory jumped into the market at the perfect time. The young husband-wife duo (aww) behind Thread Theory create casual menswear with a slim, modern cut. So, no elastic-waist pajama pants or scrubs? Believe it.

The Jedediah Pants are chino-style trousers with front slash pockets, a back yoke and back patch pockets. I bought the pattern on the day of its release at the end of July and immediately prepared the PDF and made a muslin. I bought legit fabric for it last Sunday and have already made two pairs of shorts for Corey, who before now only had one pair of ugly (sorry) dusty green cut-offs. 


Knowing that Thread Theory was a new pattern company, I'll admit I was a little wary going into the process because I didn't know what to expect of the drafting, presentation and instruction style. But DANG, they're seriously good. All of it. Even Lisa G says so, and I always trust her eagle-eye analysis of whether a pattern is well-drafted or wonky. I thought the pattern was well-marked and sewed together beautifully, and the instructions were incredibly thorough and well-illustrated. I am nothing but chuffed with the final result. 


I was impressed with the attention to detail incorporated in the pattern instructions. They tell you how to sew flat-felled seams, how to French seam the pocket bags, how to apply bias binding to the seams of the shorts, and where to add bar tacks and other methods for seam durability. Sewing the zip fly was a cinch, and seemed faster than other fly-front methods I've used. For the pants version, they even show you how to steam and stretch some of the seams for a better fit around the curves of the legs. Not like I get it, but it sounds SMART. 


Naturally, being me, I just serged and top-stitched the seams instead of flat-felling. There's an option for rolling up the cuff but I simply sewed a 1" hem at the length he wanted. I also left off the back pocket stitching design. 


For the pocket lining of both pairs of shorts, I used a scrap of floral silk cotton from my stash. I think it's his favorite part. This man loves vintage floral prints, can you tell?


(Green Oxford shirt not made by me -- but ethically sourced and sold through Everlane, a great company that's working to bring more transparency to the fashion industry.)

The two pairs of shorts I made are slightly different sizes. Corey has long ostrich legs (sorry) and is super thin. His ideal store-bought trouser size is a 29" waist, but since you can't find that very often, he has typically worn a 30" waist and dealt with the slightly baggy fit. I decided to sew the size 30 in the Jedediah pattern-- the smallest size -- and then I took in the waistband a bit more. They fit snugly when he stands -- actually hitting at the "proper" (though rare) height for waistbands. They look good for this reason, but the fabric is a cotton twill with no give at all, so he says they strain and ride up uncomfortably when he sits down. I think it's fair to say that the Jedediah pants run a little smaller than RTW sizing for that reason. I also think it's fair to say that a muslin isn't worth much unless you actually try to move around and sit in it. My bad.


For the second version of the Jedediah, I used a tobacco-colored twill that has a slightly looser weave and an eensy bit more give. I still made the size 30, but cut the edges a bit more generously and sewed the side seams, inseams and "seat seam" (Thread Theory's less cringe-worthy term for crotch seam) with a 3/8" seam allowance instead of 5/8". That seemed to add more ease and he says they're more comfortable all around even if they look a little puffy.


I think I've made it clear that I highly recommend this pattern if you're looking to sew some bottoms for your favorite guy's bottom -- or your own! Fellas, are you out there? a/s/l? ;)


The pattern is only available as a PDF for now. Morgan, the designer and seamster behind Thread Theory, will be leading a sew-along of the shorts version of the Jedediah pattern on their blog beginning August 15th -- soon! Obviously I didn't have patience to wait for it, but I have a feeling it will be clear, thorough and well-photographed for those who'd like to follow along.

Alright, the end. I have to attend to the mosquito attack I endured when we first tried to take these photos outside in our gross overgrown background. Wanna know how many bites I got on my legs and arms in, like, a six minute span? FORTY FOUR. That's no joke. I think tomorrow I'm going to wake up as a mosquito myself, geez.

So who else has been #sewingfordudes lately?

Saturday, August 3, 2013

sew bossy

The word "bossy" is funny to me. I haven't used it to describe anyone since elementary school, back when most kids didn't understand social graces and were total egocentric maniacs. Bossy girls were the worst girls (especially if they were bossy AND braggy). As a calm, quiet kid, I was often getting barked at by the bossy types.

But lemme just say the term has lessened in severity in my mind because I've actually had great bosses in my professional life. And when it comes to SEW BOSSY girls, they're totally the best girls. Bloggers Closet Case Files and Oonaballoona jump-started this idea when they swapped mystery packages of fabric and patterns and "bossed" each other into sewing them up for themselves. They have since invited other bloggers to play along in the Sew Bossy Initiative, which you can read more about on Heather's blog here. It's really just a way to bond with our beloved bloggers and challenge ourselves to sew something we wouldn't necessarily have chosen otherwise.


I've always enjoyed following the projects made by Sophie, the byootiful sewing ninja mama behind Cirque-du-Bebe, but I totally bubbled up with admiration and adoration for her during our Project Sewn adventures together. In the beginning I predicted she'd win the whole thing, and of course she did! She has such a keen eye for beautiful fabrics and prints, and her style is bold, sweet, fun, classic, sassy and refined all at the same time. So when she asked if I wanted to get a lil' bossy and swap projects with her, I knew I was in good hands. And yes, the woman delivered:


Sophie sent me the goods all the way from Brisbane, Australia. In a package covered with puffy alligator stickers! The fabric she sent is a floral print silk from the fabric store where she works (lucky ducky job). It honestly scared the sh*t out of me because I've never worked with silk before so I figured it would end in disaster. Turns out all you need is a sharp microtex needle, a rotary cutter and a LOT of fabric starch.


The pattern is the Pattern Runway Coffee Date Dress. Pattern Runway is also an Australian-based company that sells PDFs of their cute patterns via Etsy. If you've been paying attention to Pattern Runway's recent releases, then you probably recognize this pattern + fabric combo:


HEY, samesies! This is a first for me: sewing a dress in the same fabric as the sample dress on the pattern model. I mean, when do you ever get that opportunity? Turns out the Pattern Runway HQ is located just an hour away from Brisbane, so the designer and Sophie seem to shop the same sweet spots. The colors are obviously very different from each other in these photos; in real life, the fabric is much less pink and glowy than you see on the model, and a little brighter and less red than you see on me. 


You'll also notice I scooped out the neckline, which I find more flattering with my face shape and a little less puritan. Changing the neckline ended up being quite the ordeal because I'm really a pretty haphazard seamstress, but I'll gloss over that mess. I mostly followed the pattern but finished the neckline with bias tape instead of a facing. I also didn't blind-stitch the hem because this silk is so thin and delicate that my hand stitching on the wide hem quickly started looking like a hot bubbly mess.


Love these pockets.

I actually made a muslin of this dress first, because I wasn't going to blindly cut into the fancy silk that flew all the way across the open sea to reach me. I made a size 38 in the bodice and waist and graded out to a 42 in the hips. I was worried about the straight skirt but the whole thing actually fit pretty well from the get-go.


On my final version I did remove a sizable wedge of fabric from the center front bodice, because all that pleating otherwise formed a droopy sack of fabric in the middle of my bosom. Now that's how you score dates, ladies. 


I've never sewn or worn a skirt vent like this before, but I like that it doesn't flash any thigh when I walk. Have you ever walked behind a woman whose slip is sticking out of the vent of her skirt, or the back slit of her skirt is cut so high that it's a little scandalous? Anyway, no fear here with the clever fabric pyramid attached from within:


This is the color of the dress in more direct sunlight, and you can tell the fabric is pretty sheer. I will definitely wear a slip with this in public.


The dress actually has back shoulder darts! Hallelujah for us broader backed gals. Why is that so rare these days?


The waistband sits a little higher than I normally like (I think it was my fault due to my bodice alteration), and the skirt may be a weeeeee bit short for work, but otherwise I'm pretty pleased with how the dress turned out. I'm grateful to Sophie for sending me such a lovely package and bossing me into sewing florals and sewing silk for the first time. What a peach! 


And of course, thanks to Heather and Oona for hosting the Sew Bossy Initiative. I hope we made them proud.

In honor of my Pattern Runway dress, I had the newest episode of Project Runway playing on my living room TV while I was taking these photos. I kept getting distracted and watching the screen while my camera timer was going off. I caught my genuine reaction to one of the designs, in a series of eight continuous shots, so I had to post it as a GIF. I didn't realize I was so expressive when looking at crazy fashion:


The contestants would probably have the same reaction to the things I sew, too, ha.

Run, don't walk, over to Sophie's blog to see what I bossed her into sewing: HERE. SHE'S SO CUTE OMG